

How to Fix Uneven Crochet Edges: 7 Simple Tricks
Table of Contents
- Why Your Crochet Edges Are Uneven (And How to Spot the Cause)
- How to Keep Crochet Edges Straight: Fixing Tension and Turning Chains
- The Visual Diagnostic: Identifying Missing or Extra Stitches
- How to Block a Crochet Blanket to Square Up Uneven Edges
- Best Crochet Border Patterns for Beginners to Hide Imperfections
- The Frogging Dilemma: When to Unravel and Start Over
- Final Thoughts on Fixing Uneven Crochet Edges
- Frequently Asked Questions
Last Updated: September 7, 2026
Uneven crochet edges are a common frustration, but most have simple, fixable causes. This guide shows how to fix uneven crochet edges with seven practical tricks.
Uneven edges usually stem from tension shifts, missed stitches, and turning chain errors that compound as you work. Spotting these early saves hours of unraveling. Below, we cover each cause, how to diagnose it visually, and techniques to correct your work.
Why Your Crochet Edges Are Uneven (And How to Spot the Cause)
Uneven crochet edges happen when your stitch count changes between rows or tension varies. Skipping the first or last stitch of a row slowly shrinks or widens the fabric; inconsistent tension pulls edges inward or lets them flare outward.
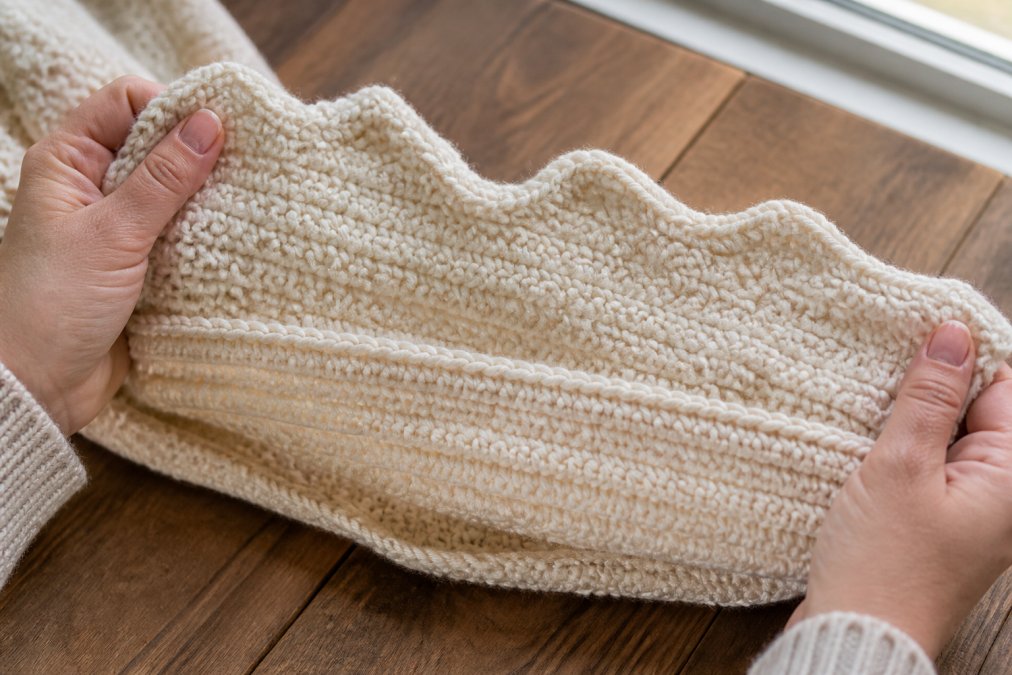
Lay your work flat and examine the edge. A diagonal slant means dropped or added stitches at row ends. A scalloped edge points to tension changes. A curved edge signals a foundation chain tighter or looser than your main rows.
How to Keep Crochet Edges Straight: Fixing Tension and Turning Chains
Consistent tension starts with how you hold the yarn and hook. Many crocheters grip tighter when concentrating, narrowing rows. Pause every few rows and measure your fabric's width to keep gauge even.
Turning chains need equal attention. For single crochet, one chain usually works; for double crochet, you often need two or three (craftyarncouncil.com). Too short pulls the edge down; too long bows it out. Matching turning chain height to stitch type is a key fix for uneven crochet edges.
Mastering Your Starting Chain and Row Counts
A tight foundation chain puckers the bottom edge. Try a hook one size larger for the foundation chain only, then switch back for the body.
Use a row counter or stitch markers in the first and last stitch of every row to catch missed stitches before they become a visible curve.
The Visual Diagnostic: Identifying Missing or Extra Stitches
Counting tells you a problem exists, not what it is. Diagnose the specific error by looking at the fabric's silhouette. Here is a visual guide to the four most common edge profiles.
Edge Profile 1: The Diagonal Slant
What it looks like: The edge angles inward or outward at roughly 45 degrees, creating a parallelogram shape.
What it means: You are consistently dropping or adding a stitch at the end of every row. A left slant usually means you are missing the last stitch; a right slant often means you are working into the turning chain.
The fix: Check the last stitch of each row, it should look like a 'V' on top of the post below. Place a stitch marker in that stitch before turning for a clear target next row.
Edge Profile 2: The Scalloped Wave
What it looks like: The edge ripples in gentle peaks and valleys, with width fluctuating by a quarter to half an inch every few rows.
What it means: This is almost always a tension issue, not a count issue. Your gauge shifts when you switch positions or pick up the project after a break.
The fix: Measure fabric width every five rows. If it changes by more than an eighth of an inch, check your grip, crafters often grip tighter when tired. Loosen tension for the next few rows to bring the edge back.
Edge Profile 3: The Bow or Smile
What it looks like: The edge curves smoothly in one direction, bowing outward or pulling inward, affecting the entire length.
What it means: This points to your foundation chain. A tight chain pulls the bottom edge inward; a loose chain flares it outward. The body is fine, the starting chain does not match your gauge.
The fix: Work a small swatch and measure its width, then chain the same number of stitches and measure. If the chain is narrower, go up one hook size for the foundation chain only, then switch back.
Edge Profile 4: The Ragged Zigzag
What it looks like: The edge has a jagged texture with visible bumps and dips that do not follow a regular pattern.
What it means: This is a turning chain problem. The chain's height must match the stitch you are about to work. Too few chains pull the edge down; too many bulge it. Inconsistent chains create a ragged line.
The fix: Match your turning chain to stitch height: single crochet chain 1, half double crochet chain 2, double crochet chain 3, treble crochet chain 4. If double crochet still pulls, try chain 2. Consistency is key.
| Problem | Visual Sign | Common Cause | Quick Fix |
|---|---|---|---|
| Slanted edge | Edge angles diagonally | Dropped or added stitches | Count stitches each row |
| Wavy edge | Edge ripples or flares | Tension changes | Check gauge regularly |
| Curved edge | Bows inward or outward | Tight or loose foundation chain | Use larger hook for chain |
| Ragged edge | Uneven bumps and gaps | Inconsistent turning chain height | Match chain to stitch type |
How to Block a Crochet Blanket to Square Up Uneven Edges
Blocking is the most effective way to fix minor unevenness without unraveling. The yarn fiber determines the method, drying time, and how much correction to expect.
Acrylic Yarn: The Steam-Only Approach
Acrylic is thermoplastic, responding to heat, not water (pubs.acs.org). Damp blocking does nothing because the fibers do not absorb water.
The technique: Steam blocking is correct. Hold a steam iron or steamer 1 to 2 inches above the fabric, never touch the yarn directly. Apply steam evenly, stretch the edge gently, pin if needed, and let it cool completely to set the shape.
What it can fix: Steam blocking corrects wavy edges from tension fluctuations up to half an inch. It cannot fix a missing stitch count.
Wool and Wool Blends: The Damp Block Standard
Wool is elastic and responds well to moisture. Damp blocking is the standard method for wool and most wool blends.
The technique: Soak in lukewarm water with wool wash for 15 to 20 minutes. Do not agitate. Press out water, roll in a towel, lay flat, pin corners first, then pin every 2 to 3 inches. Pull gently to meet pins without overstretching.
Drying time: Wool takes 24 to 48 hours to dry (extension.org). Do not remove pins until bone dry, or the wool will spring back.
Cotton and Linen: The Firm Pin
Cotton and linen are inelastic. They hold the shape you pin them into but resist being forced into a new shape.
The technique: Use the same damp method as wool, but pin more aggressively, every 1 to 2 inches, using rust-proof T-pins to correct even minor waves.
Drying time: Cotton and linen dry in 12 to 24 hours and hold their shape well after washing.
The Blocking Mat Setup
You do not need expensive equipment. Interlocking foam puzzle mats (under $20) work as a blocking surface. Use rust-proof T-pins or blocking wires, which distribute tension evenly for straight edges.
When Blocking Will Not Save You
Blocking has a hard limit. If your edge is off by more than one stitch per row, the fabric will not lie flat. Frog back to the error or add a corrective border. Blocking is a finishing technique, not a structural repair.
Best Crochet Border Patterns for Beginners to Hide Imperfections
A simple single crochet edging evens out minor waves with a clean, uniform line. Work one single crochet in each stitch and row end, adding extra stitches at corners to keep them flat.
A crab stitch (reverse single crochet) creates a twisted rope effect that draws the eye from uneven edges. Double crochet shells mask small gaps. Practice on a swatch first.
The Frogging Dilemma: When to Unravel and Start Over
Frogging feels like defeat but is often the fastest path to a piece you will be proud to gift. If your uneven crochet edges are minor and hidden by a border or blocking, keep going.
Restart when the edge is off by multiple stitches per row. A fresh start with a counted foundation chain and stitch markers often produces straighter edges in less time than patching a flawed piece.
Final Thoughts on Fixing Uneven Crochet Edges
Fixing uneven crochet edges improves with every project. Start by diagnosing the cause, then apply the simplest fix, adjusting your turning chain, blocking, or frogging back to a clean start.
At Crochet Creations Hub, we believe every maker deserves to feel proud of their handmade work. Explore our collection of instant download patterns and grab our free pattern to practice these techniques on a project you will love. Get started with Crochet Creations Hub and turn uneven edges into a thing of the past.
Frequently Asked Questions
Why are my crochet edges crooked?
Crooked edges usually come from accidental increases or decreases at the row ends. Adding an extra stitch makes the edge flare out, while missing the last stitch pulls it inward. Inconsistent tension and a turning chain that is the wrong height also cause waviness. Using stitch markers on the first and last stitches of each row helps you see where errors happen. Fixing these small issues will make your straight edges consistent from the foundation chain to the final row.
Can you fix a crochet blanket with uneven sides?
Yes, you can fix an uneven blanket without starting over. First, try damp blocking or steam blocking to stretch the fabric into shape. If the edges are still wavy, a single crochet border can even out minor inconsistencies. For larger differences, work a border row that uses decreases or increases to draw the sides in or let them out gradually. A well-chosen border pattern is often the best way to hide flaws and create a professional finish.
What is the best border for uneven crochet edges?
For noticeably uneven edges, a simple single crochet border is the most forgiving choice. It creates a clean, flat frame and lets you adjust the stitch count easily. Work one single crochet per row-end stitch along the sides, and skip stitches on the top and bottom if the edge is wavy. Once the single crochet row is complete and straight, you can add a more decorative border, like a shell or scallop stitch, for a polished look.
Does blocking really fix crooked crochet work?
Blocking works wonders for most natural fibers like wool and cotton. It relaxes the yarn and allows you to pin the fabric into the correct shape, which helps even out minor tension issues and wavy edges. Damp blocking works well for wool, while steam blocking is better for acrylic. However, blocking cannot fix edges where the stitch count is wrong. You must correct missing or extra stitches first, because blocking only stretches the fabric, it does not create new stitches.