

Intermediate Crochet Patterns: 7 Projects to Level Up
Table of Contents
- What Makes a Crochet Pattern Intermediate?
- Intermediate Crochet Stitches to Learn First
- Essential Tools for Intermediate Crocheters
-
7 Intermediate Crochet Patterns to Build Your Skills
- Blue the Butterfly: Your First Shaping Project
- The Bunny Carrot: A 2-in-1 Lesson in Assembly
- Elvina the Butterfly: Mastering Puff Stitches
- Bunny with Colorful Ears: Colorwork and Layering
- Butterfly Bag: Garment-Style Construction
- Plush Snuggler Bunny: Working with Chenille
- Bunny Hand Puppet: Techniques for Shaping
- How to Choose Your Next Intermediate Project
- Common Mistakes Intermediate Crocheters Make
- Conclusion: Your Next Skill-Building Project Awaits
- Frequently Asked Questions
Last Updated: September 5, 2026
What Makes a Crochet Pattern Intermediate?
The jump from beginner to intermediate crochet patterns is less about learning new stitches and more about how stitches work together. Intermediate patterns typically introduce shaping, assembly, color changes, or stitch combinations that require careful counting and reading ahead.
At Crochet Creations Hub, we design our intermediate crochet patterns to teach one specific technique per project. Most crafters find that the transition happens naturally. You master the foundation chain and turning chain, then suddenly you are ready to shape ears, wings, and limbs that require invisible decreases and precise stuffing.
Intermediate Crochet Stitches to Learn First
Before starting a complex project, focus on the stitches that appear most often in intermediate patterns. These techniques form the building blocks of amigurumi and garment-style construction.
Post Stitches, Bobbles, and Clusters
Post stitches wrap around the body of the row below rather than through the top loops. Front post double crochet creates raised ridges, while back post double crochet creates recessed lines. Bobble and cluster stitches add texture by grouping multiple yarn overs into one stitch. These techniques change the drape and surface of your fabric, making them essential for textured wings and decorative borders.
Working in Front and Back Loops
Front loop only and back loop only crochet create ribbing and angled shapes. Working in the front loop tilts your stitches forward; the back loop tilts them backward. This subtle shift is how designers create curved wings, layered ears, and the distinctive shaping found in intermediate patterns. Practice switching between loops mid-row to keep your edges straight.
Essential Tools for Intermediate Crocheters
Intermediate crochet requires more than yarn and a hook. You need stitch markers to track increases, a yarn needle for invisible seaming, and fiberfill for stuffing amigurumi. Safety eyes add character to animal projects, while embroidery thread creates facial details.
A good pair of scissors and a measuring tape help you check gauge as you work. Many intermediate crocheters also invest in blocking mats and pins for finishing lace or garment-style pieces.
7 Intermediate Crochet Patterns to Build Your Skills
These seven projects from Crochet Creations Hub are ordered by difficulty, so each one prepares you for the next. Every pattern costs $1.99 and downloads instantly as a PDF with step-by-step photos and assembly guides.
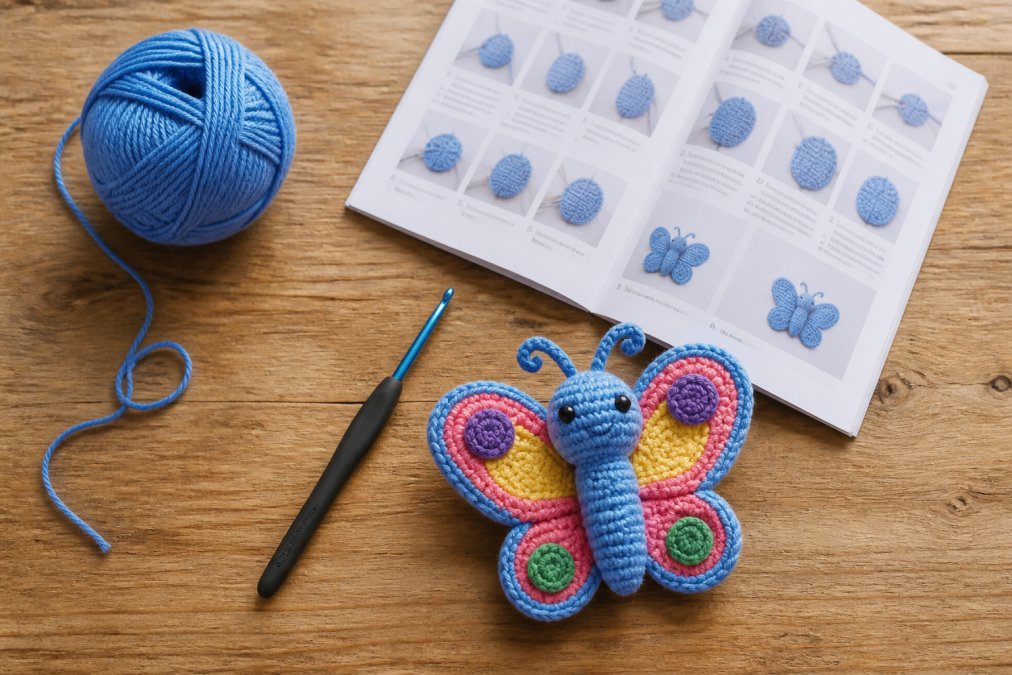
Blue the Butterfly: Your First Shaping Project
This pattern teaches shaping through increases and decreases that form the butterfly's wings and body. You will work with worsted weight yarn and a 3.25 mm hook to create an 11-inch plush with heart-shaped antennae and oversized feet. The pattern includes an assembly guide and reference photos, making it an approachable first intermediate project.
The Bunny Carrot: A 2-in-1 Lesson in Assembly
A clever transforming design, the Bunny Carrot features a gray bunny whose oversized carrot ears wrap around and button closed. Working with sport-weight yarn and a 1.75 mm hook, you will practice thread-mounted limbs and button closures. The finished toy measures 5 to 6 inches and teaches you how separate pieces come together into one cohesive design.
Elvina the Butterfly: Mastering Puff Stitches
Elvina introduces puff stitches through delicate layered wings and a violet dotted body. Using a 2.5 mm hook and cotton yarn, you will create an 11 cm butterfly with embroidered sleepy eyes and French-knot details. The pattern also includes a coordinating daisy, giving you practice with small, precise motifs.

Bunny with Colorful Ears: Colorwork and Layering
This oversized bunny reaches 65 cm including its ears, making it a statement project. Working with plush yarn and a 4 mm hook, you will practice color changes and back-loop crochet to create the layered pink-and-cream ears. The body and head are worked as one piece, which simplifies assembly while teaching you how to manage a large continuous shape.
Butterfly Bag: Garment-Style Construction
The Butterfly Bag moves beyond toys into wearable accessories. You will crochet two complete butterfly panels with medium weight yarn and a 4.5 mm hook, then join them to a customizable strap. Frequent color changes and treble crochet stitches build the wing detail, while the optional fabric lining teaches you about finishing techniques for bags.
Plush Snuggler Bunny: Working with Chenille
Chenille yarn behaves differently than standard worsted weight. This 16-inch snuggler bunny teaches you to work with plush fibers that hide your stitches, using a 4 mm hook and continuous spiral rounds. The pattern includes guidance on embroidered faces, which is essential when safety eyes are difficult to see in fluffy yarn.
Bunny Hand Puppet: Techniques for Shaping
This 11-inch puppet requires careful shaping to create a hand cavity while maintaining the bunny's form. Using super bulky yarn and a 4.5 mm hook, you will work increases and decreases to shape the head, ears, and body. The pattern includes video tutorial links for selected assembly techniques, making it a great bridge between written and visual learning.
| Pattern | Skill Focus | Finished Size | Recommended Hook |
|---|---|---|---|
| Blue the Butterfly | Shaping, assembly | 11 inches | 3.25 mm |
| The Bunny Carrot | Assembly, button closure | 5-6 inches | 1.75 mm |
| Elvina the Butterfly | Puff stitches, embroidery | 11 cm | 2.5 mm |
| Bunny with Colorful Ears | Colorwork, large-scale rounds | 65 cm | 4 mm |
| Butterfly Bag | Garment construction | Custom | 4.5 mm |
| Plush Snuggler Bunny | Chenille yarn, embroidery | 16 inches | 4 mm |
| Bunny Hand Puppet | Shaping, hand cavity | 11 inches | 4.5 mm |
How to Choose Your Next Intermediate Project
Selecting the right project is the difference between a satisfying skill-building experience and a frustrating WIP that ends up in a drawer. The most common reason intermediate crocheters abandon projects isn't lack of skill, it's a mismatch between the project's demands and the crafter's goals, time, and tolerance for repetition.
Step 1: Diagnose Your Specific Skill Gap
Instead of asking "What should I make next?", ask "What went wrong on my last project?" Your answer points directly to the technique you need to practice.
- If your amigurumi has gaps at the seams → You need practice with invisible decreases and mattress stitch assembly. Choose a project with multiple attached parts, like the Bunny Hand Puppet.
- If your color changes leave jagged lines → You need to master the invisible color change and consistent tension when carrying yarn. The Butterfly Bag is designed to force frequent, precise color switches.
- If your fabric curls or your gauge is off → You need to practice with a new yarn weight or fiber. The Plush Snuggler Bunny, worked in chenille, will teach you to read your stitches when they are less defined.
- If you get lost in long rounds → You need a project that forces you to use stitch markers and count regularly. The Bunny with Colorful Ears, with its large continuous body, is ideal for this.
Step 2: Estimate Your Time Budget Realistically
Intermediate crafters often struggle with project scope. A pattern's finished size is less important than the stitch density and yarn weight. Here is a practical framework for estimating hours (a 4-inch square of single crochet in worsted weight takes an average crafter 30-45 minutes):
- Quick Wins (4-8 hours): Projects using bulky or super bulky yarn (like the Bunny Hand Puppet) or small motifs (like the coordinating daisy in the Elvina pattern). These are perfect for a weekend or a week of evening sessions.
- Weekend Projects (8-15 hours): Most medium-sized amigurumi in worsted weight yarn, such as Blue the Butterfly. The repetitive shaping is easy to pick up and put down.
- Long-Term Commits (15-30+ hours): Projects with fine yarn (sport weight or lighter), complex colorwork, or large continuous pieces. The Bunny Carrot, with its 1.75 mm hook, and the 65 cm Bunny with Colorful Ears fall into this category. These are best for crafters who can dedicate a few hours per week over a month.
Step 3: Match the Project to Your Learning Style
If you learn best by watching, prioritize patterns with video tutorials for their trickiest sections. If you prefer to read ahead, look for patterns with detailed step-by-step photos and written explanations. The Bunny Hand Puppet offers written instructions with video links for assembly. For pure stitch mastery without assembly, choose a single-piece project like the Butterfly Bag panels.

This three-step framework, diagnose, estimate, and match, helps you strategically select a project that guarantees you learn something new.
Common Mistakes Intermediate Crocheters Make
The jump to intermediate isn't just a test of new stitches; it's a test of your mental model of crochet. Beginner patterns let you rely on muscle memory. Intermediate patterns require you to predict what the next row will look like.
The #1 Mistake: Misreading the 'Shape' of the Pattern
Beginners read a pattern line by line. Intermediate crocheters must read it in three dimensions. The most frequent error is not counting stitches, but failing to understand why the count changes. When a pattern says "sc in next 5 st, 2 sc in next st," you aren't just following instructions, you're creating a curve. If you don't visualize that curve, you won't notice a missed increase until the piece starts to ruffle or cup, which is often 10 rows later.
The Fix: Before you start a new section, read the entire paragraph of instructions. Ask yourself: "Is this section flat, increasing, or decreasing?" If it's a sleeve, it should increase. If it's a flat panel, the count should stay the same. This 30-second mental check prevents hours of frogging.
The 'Tension Trap' of New Yarn Fibers
Intermediate patterns often introduce new fibers, chenille, cotton, or linen blends, that behave differently than the acrylic worsted weight you learned on. Chenille hides your stitches, cotton has no give, and linen is unforgiving (thesprucecrafts.com). Crafters who were 'good' at tension with acrylic suddenly find their work too tight or too loose.
The Fix: Treat a new yarn fiber like a new skill. Crochet a 4x4 inch swatch, wash it the way you'll wash the finished item, and then measure your gauge after it dries. Cotton and linen can grow significantly; superwash wool can stretch (yarnsub.com). Adjust your hook size based on the swatch, not on the pattern's suggestion.
The Frustration of the 'Ugly Middle'
Many intermediate projects look terrible at the 30% mark. The shaping isn't obvious, the colorwork looks messy, and the pieces don't resemble the photo. This is a psychological hurdle, not a technical one. Novice crocheters often quit here, assuming they've made an error.
The Fix: Before starting, identify the 'milestone row', the point at which the project will start to look like the final object. For the Bunny with Colorful Ears, it's when the ears are attached. For the Butterfly Bag, it's when the two panels are joined. Write this milestone on a sticky note. When you hit the ugly middle, your only job is to reach that milestone before judging the project.

The 'One More Row' Fatigue Error
Intermediate patterns require intense focus. The most common counting errors happen 45 minutes into a session, when your hands are on autopilot and your mind has wandered (psychologytoday.com).
The Fix: Use a row counter or a piece of paper to physically check off each completed row. When you find yourself re-reading the same instruction three times, stop. Your brain is fatigued, and the next 15 minutes of crochet will likely need to be frogged anyway. Take a break, and return with fresh eyes.
By understanding these patterns, the misread shape, the tension trap, the ugly middle, and fatigue, you can preempt the frustration that stalls most intermediate crocheters.
Conclusion: Your Next Skill-Building Project Awaits
Intermediate crochet is about more than finishing a project; it is about learning to trust your hands and your stitch count. Each pattern in this collection builds on the last, turning unfamiliar techniques into muscle memory.
Crochet Creations Hub offers instant digital downloads so you can start your next project the moment inspiration strikes. Every pattern includes step-by-step photos, materials lists, and assembly guidance, all rated with a 5.0 out of 5.0 customer score. Browse the collection to find the technique you want to master next, and get your free pattern to begin building your skills today.
Frequently Asked Questions
What should I crochet as an intermediate?
Choose projects that introduce one or two new techniques without overwhelming you. Amigurumi toys with shaping and assembly, like the Blue the Butterfly pattern, teach increases, decreases, and sewing parts together. Accessories such as the Butterfly Bag build colorwork and garment-style construction skills. Pick a project where you already know 80 percent of the stitches, so the remaining 20 percent becomes a manageable challenge.
What defines an intermediate skill level in crochet?
An intermediate crocheter can work beyond basic single and double crochet. You should be comfortable reading written patterns, maintaining an even gauge, and working in the round. Intermediate patterns often include post stitches, bobbles, clusters, front and back loop work, and simple color changes. You are also expected to handle basic shaping with increases and decreases, plus assembly steps like sewing pieces together or adding safety eyes.
What new stitches should I learn to advance my crochet skills?
Start with the post stitches: front post double crochet and back post double crochet create ribbed texture. Then try bobble, cluster, and shell stitches to add dimension. Puff stitches, featured in the Elvina butterfly pattern, build similar skills with a softer look. Practice working in front loops only and back loops only, since these create stretchy ridges. These stitches appear constantly in intermediate patterns and prepare you for more complex designs.
How do I know if I am ready to move from beginner to intermediate crochet?
You are ready when basic patterns feel repetitive and you can maintain consistent tension without checking your work constantly. Try a pattern labeled intermediate and assess your comfort level. If you can follow written instructions, count stitches accurately, and fix simple mistakes like a missed increase, you have the foundation. A pattern like the Bunny Carrot works well as a bridge because it uses basic stitches but adds shaping, color changes, and button closures.
This article was written using GrandRanker