

How to Crochet Baby Booties Step by Step (2026 Guide)
Table of Contents
- What You'll Need to Crochet Baby Booties Step by Step
- Best Yarn for Baby Booties: Weight, Fiber, and Safety
- Stitches and Abbreviations You'll Use
- Step 1: Foundation Chain and Working the Sole
- Step 2: Shaping the Toe, Heel, and Cuff
- Crochet Baby Booties Size Chart for Newborns to 12 Months
- Step 3: Finishing Touches, Seaming, and Weaving in Ends
- How Long Does It Take to Crochet Baby Booties?
- Frequently Asked Questions
Last Updated: September 11, 2026
What You'll Need to Crochet Baby Booties Step by Step
Learning how to crochet baby booties step by step starts with four items: a crochet hook, baby-safe yarn, a tapestry needle, and stitch markers. This guide walks you through every stitch, from the foundation chain to the final woven end.

Small projects like infant footwear are the fastest way to build confidence with shaping. The bootie is worked flat or in the round, then seamed and finished.
Hooks, Yarn, and Small Tools
Hook size matters more than most beginners expect. For worsted weight yarn, a 4.0 mm to 5.0 mm hook is the standard starting point; for finer yarns, drop to 3.0 mm or 3.5 mm (craftyarncouncil.com). Check the yarn label's recommended hook size first, then match it.
Your basic kit:
- Crochet hook in the size your yarn calls for (a 4.0 mm / US G-6 and a 5.0 mm / US H-8 cover most worsted-weight bootie patterns)
- Worsted weight or DK yarn in a soft, baby-safe fiber
- Tapestry needle for seaming and weaving in ends
- Stitch markers to track the first stitch of each round
- Small scissors
Yarn Weight, Fiber, and Baby-Safe Choices
Most tutorials skip this, but the yarn you pick decides whether the booties actually stay on a wriggling foot and survive the wash. Here is how the common options compare:
- Worsted weight (Category 4, roughly 4-5 stitches per inch on a 5.0 mm hook): the default for bootie patterns (craftyarncouncil.com). Fast to work, holds its shape, and easy to find in baby-safe fibers.
- DK / light worsted (Category 3, roughly 5-6 stitches per inch on a 4.0 mm hook): a finer fabric that looks more delicate on tiny feet but takes longer to work.
- Sport and fingering (Categories 2 and 1): too fine for most beginner bootie patterns; the shaping rounds get fiddly and the sole comes out thin.
Fiber matters just as much as weight. For babies, the practical shortlist is:
- Cotton: breathable, machine washable, holds stitch definition, and does not pill easily. Mercerized cotton has a slight sheen but less stretch.
- Acrylic: inexpensive, fully machine washable and dryable, and widely available in soft baby lines. Cheaper acrylics can feel squeaky on the hook.
- Cotton-acrylic blends: the best of both. The cotton adds breathability and structure; the acrylic adds softness and stretch.
- Bamboo and bamboo blends: silky and cool against skin, but heavier and prone to stretching out of shape over time.
Avoid mohair, scratchy wool, and any yarn with loose halo fibers that could wrap around tiny toes. If you are making booties as a gift, check the yarn label for a machine-washable symbol before you commit.
Why Gauge Swatches Matter for Infant Footwear
A gauge swatch is a small test square, usually 10 cm by 10 cm, that tells you how many stitches and rows your yarn and hook actually produce. Skipping it is the single most common reason booties come out too small or too large.
Work a swatch, measure it, and adjust your hook size until the stitch count matches the pattern. A half-millimeter change in hook size can shift a bootie by a full size.
If your swatch comes out wider than the pattern calls for, go down one hook size. If it comes out narrower, go up. Re-swatch after each change; do not eyeball it.
Best Yarn for Baby Booties: Weight, Fiber, and Safety
The best yarn for baby booties is a soft, washable worsted weight or DK yarn in cotton, acrylic, or a cotton-acrylic blend. These fibers hold their shape after washing and won't irritate delicate skin. Avoid mohair, scratchy wool, and any yarn with loose fibers that could wrap around tiny toes.
Machine washability is the practical test. New parents wash everything, often. A yarn that survives a gentle cycle and air-dries without pilling will get far more use than a delicate fiber that needs hand washing.
Why Gauge Swatches Matter for Infant Footwear
A gauge swatch is a small test square, usually 10 cm by 10 cm, that tells you how many stitches and rows your yarn and hook actually produce. Skipping it is the single most common reason booties come out too small or too large.
Work a swatch, measure it, and adjust your hook size until the stitch count matches the pattern. A half-millimeter change in hook size can shift a bootie by a full size.
Stitches and Abbreviations You'll Use
Five stitches cover nearly every beginner bootie pattern. Learn these and you can read most patterns without a glossary.
- ch (chain stitch): the foundation of every project
- sc (single crochet): the densest, most stable stitch, ideal for soles
- hdc (half double crochet): slightly taller, good for the upper
- dc (double crochet): taller and looser, used for cuffs
- sl st (slip stitch): joins rounds and moves across stitches without height
The slip knot starts your foundation chain, and yarn over describes wrapping the yarn around your hook before pulling through. Turning chain is the extra chain stitches at the end of a row that keep your edges straight.
Step 1: Foundation Chain and Working the Sole
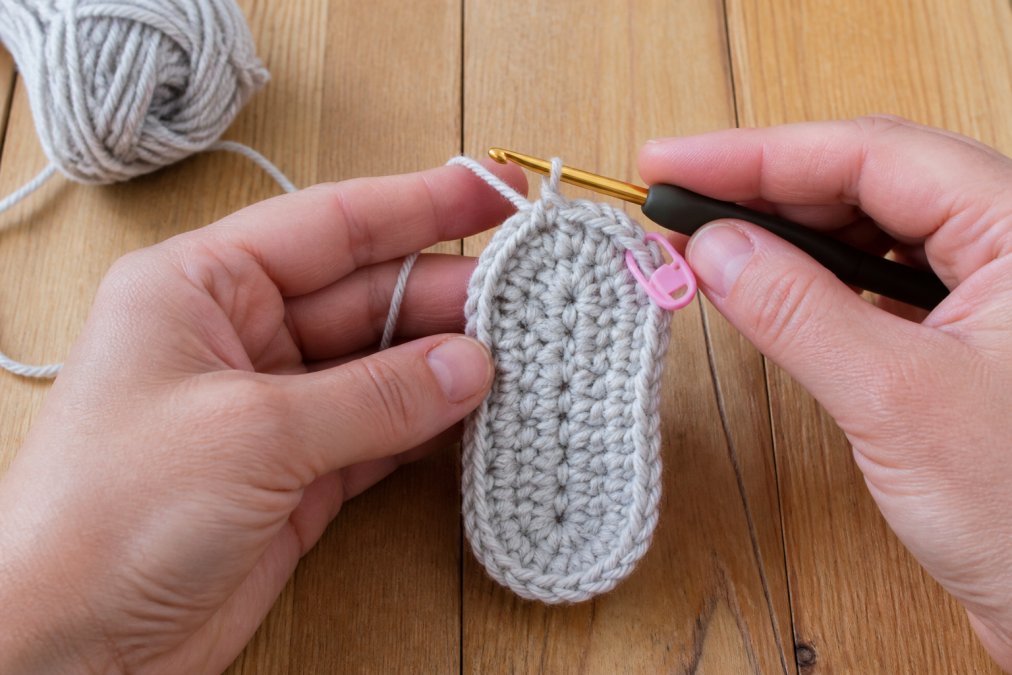
Start with a foundation chain sized to your pattern's newborn count, then work single crochet along both sides of the chain to build an oval sole. The oval shape is what gives a bootie its footprint.
Work increases at each end of the oval to round the toe and heel. Count your stitches at the end of every round; a missed increase here throws off the entire bootie.
Working Flat vs. Working in the Round
Flat construction means you crochet in rows and turn at the end of each one, then seam the bootie closed. Working in the round means you crochet continuously in a spiral or joined circle, with no seam at all.
Round work looks cleaner and avoids a bulky seam along the sole, but it demands a stitch marker at the start of every round. Flat work is easier to keep track of and simpler to size up or down. Beginners often find flat construction more forgiving.
Step 2: Shaping the Toe, Heel, and Cuff
Shaping turns a flat oval into a three-dimensional bootie. You decrease across the toe to close the front, work short rows or decreases at the heel to cup the back, then build the cuff upward from the opening.
Decreases are usually single crochet two together (sc2tog) or double crochet two together (dc2tog). Place them symmetrically on both sides of the toe, or the bootie will lean.
The cuff is where you can play. A ribbed cuff in half double crochet or double crochet holds the bootie on wriggly feet. Add a turning chain at the start of each cuff row to keep the edge even.
Crochet Baby Booties Size Chart for Newborns to 12 Months
Baby bootie sizing runs on foot length, not age, because babies grow at wildly different rates. Measure the baby's foot from heel to big toe, then add a small allowance for wiggle room.
| Size | Foot Length | Typical Age | Sole Chain (approx.) |
|---|---|---|---|
| Newborn | 8-9 cm | 0-3 months | 9-11 chains |
| Infant | 9-10 cm | 3-6 months | 11-12 chains |
| Crawler | 10-11 cm | 6-9 months | 12-13 chains |
| Toddler | 11-12 cm | 9-12 months | 13-14 chains |
Treat the chain counts as a starting point and confirm against your gauge swatch. A bootie that measures correctly flat will fit correctly on the foot.
Step 3: Finishing Touches, Seaming, and Weaving in Ends
Finishing is what separates a handmade-looking bootie from a professional one. Seam with the same yarn you crocheted with, using a tapestry needle and a simple whipstitch or mattress stitch along the sole edge.
Weave in every end on the wrong side of the work, running the needle through several stitches in two directions so the tail can't work loose. Trim close to the fabric, not flush.
Fasten off by pulling the final loop through and tightening. Then block the booties lightly: dampen them, shape them by hand, and let them air-dry. Blocking evens out stitch tension and settles the cuff.
Adding Embellishments Safely
Ribbons, buttons, and flowers turn a plain bootie into a keepsake, but they are also the part of the project most likely to come loose in a baby's mouth. A few ground rules keep the finished pair gift-worthy and safe:
- Skip small buttons entirely for babies under 12 months. (cpsc.gov) Anything that fits through a toilet-paper tube is a choking hazard, and a baby's grip is stronger than most crafters expect.
- If you want a button look, embroider it. A French knot or a satin-stitch circle gives the same visual without a loose part.
- Sew any attached embellishment with doubled thread and at least six passes. Knot on the wrong side, then weave the tail through the fabric in two directions.
- Use ribbon as a tie only if it is stitched down at both ends. A loose ribbon can wrap around a toe or ankle.
- Test the pull. After finishing, give each embellishment a firm tug. If it moves, reinforce it before gifting.
A common pattern is to add a simple crocheted flower or a small pom-pom to the toe, both of which can be sewn on with the same yarn used for the bootie. Avoid anything dangling, beaded, or glued.
Blocking and Final Shaping
Blocking evens out stitch tension and settles the cuff. For cotton and cotton-blend booties, mist them with water, shape them by hand on a flat surface, and let them air-dry away from direct heat. For acrylic, a light steam block with an iron held an inch above the fabric works, but do not press the iron directly onto the stitches or they will flatten permanently.
Once dry, try the booties on a flat surface: the sole should lie flat, the cuff should stand up on its own, and the opening should stretch enough to slide over a foot without gaping. If the opening is too tight, work one more round of single crochet around the top edge with a hook one size larger.
If you'd rather skip the guesswork, Crochet Creations Hub offers a Classic Baby Boots Crochet Pattern with written instructions, 50+ step-by-step progress photos, and three sizes in one download. Their Plush Baby Booties pattern is a good next step once you've mastered the basics.

How Long Does It Take to Crochet Baby Booties?
Most crocheters finish a pair of baby booties in two to four hours. The first bootie takes longer while you work out the shaping; the second goes noticeably faster because your hands already know the pattern.
Time breaks down roughly like this:
- Gauge swatch: 15-20 minutes
- First bootie: 60-90 minutes
- Second bootie: 45-60 minutes
- Seaming, weaving in ends, and blocking: 20-30 minutes
Speed comes with repetition, not with rushing the shaping. A bootie worked too tightly will be stiff and hard to get onto a wriggling foot.
Handmade booties make a beautiful gift, but the shaping steps trip up most beginners the first time. At Crochet Creations Hub, every pattern comes with detailed photo instructions, instant digital downloads, and printable resources like our crochet planner to keep your projects organized. Start with the Bunny Booties pattern for a charming first pair, or browse the full collection and claim your free pattern to begin.

Frequently Asked Questions
What size crochet hook should I use for newborn baby booties?
Most baby bootie patterns use a 3.5 mm (E-4) to 4.0 mm (G-6) hook with worsted weight yarn, or a 2.5 mm to 3.0 mm hook with fingering weight. The right hook is the one that matches your pattern's gauge swatch. If your swatch comes out larger than the pattern states, go down a hook size; if smaller, go up. Always check the pattern's recommended hook size before starting.
What is the best yarn for crocheting baby booties?
Soft, machine-washable yarns work best. Worsted weight acrylic or cotton blends are durable and easy to clean, while DK or fingering weight yarns give a finer, more delicate look. Avoid scratchy wool or any yarn that sheds heavily, since booties sit directly against a baby's skin. Check the yarn label for a softness rating and washability before you buy.
Can you crochet baby booties flat instead of in the round?
Yes. Flat construction means you work the sole and upper as one piece back and forth, then seam the heel and top edges together. Working in the round creates a seamless bootie but requires stitch markers to track rounds. Flat patterns suit beginners because there is no spiral to follow, while round patterns look cleaner on the finished bootie.
How long does it take to crochet a pair of baby booties?
A simple pair of baby booties takes most crocheters 1 to 3 hours. Beginners working a first pair might spend 3 to 4 hours, while experienced makers finish in under an hour. Using worsted weight yarn and a larger hook speeds things up. Making both booties at the same time in one sitting helps keep your tension and stitch count consistent.